
If you have an inboard engine, one of the recommended maintenance tasks is to inspect and replace risers and manifolds on the engine if they have deteriorated. An important part of boating and enjoying your time on the water is properly maintaining your vessel and making sure it is in tip top shape each season. In this article, we will explain the need for this inspection, the tools to do it, a step by step on how to remove them, and how to determine if your risers need replaced.
What are the Manifolds and Risers and What Do They Do?
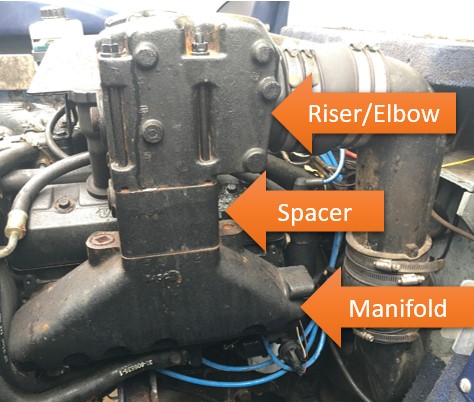
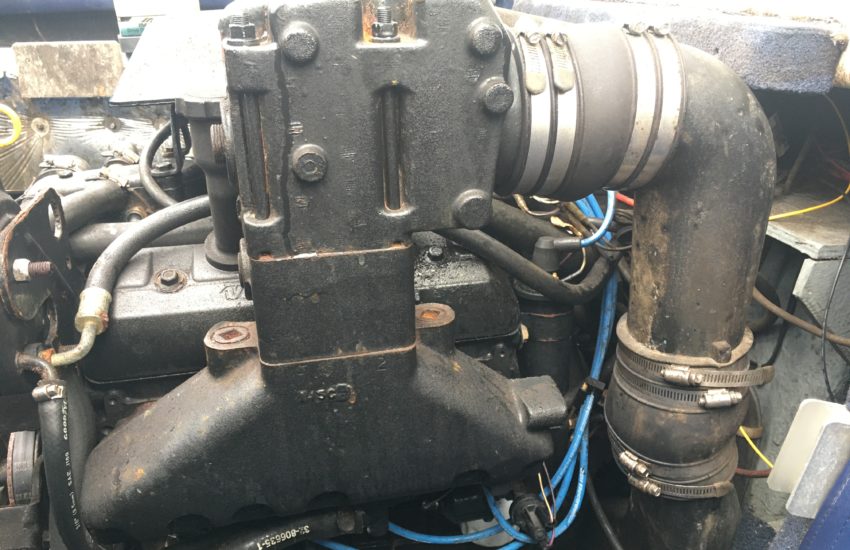
The exhaust manifolds and risers on your boats engine guide the exhaust gases out of your engine block to the exterior of the boat. The exhaust gases coming out of your boats engine are very hot. Due to heat, the manifolds and risers are built with water passages that circulate water to help cool these components as well as the exhaust gases themselves. These components are made out of iron which is durable and can withstand the hot temperatures, but are also susceptible to rusting and rotting out.
Why Do the Manifolds and Risers Need to be Inspected?
Over the years, the manifolds and risers tend to break down, clog, and even produce holes if left long enough. Being made out of iron, they are very susceptible to rusting and corroding. After years of use, the walls of these manifolds will eventually break down. As the walls become thinner, there is a chance they can form holes. Depending on where a hole is formed within these components, a few different things can happen:
- Engine temperatures reaching higher than typical running temperatures (usually while running the boat at higher than idle RPMs)
- Water leaking into the exhaust chamber and eventually into the engines cylinder area
- Water leaking on the outside of the manifold or riser, typically starting at a mating surface where there is a gasket
It goes without saying that if your engine is operating at temperatures higher than intended, this could cause damage to it. Not only can holes cause improper water flow, corrosion and scaling can cause clogs within these water passages restricting the flow of water through the system.
If water leaks into the exhaust chamber, it will initially be blown out the exhaust exit of the boat in the form of vapor. If left untreated, this leak could become larger and eventually leak into the boats cylinders which can be detrimental to your engine. Unlike air, water does not compress. If enough water gets into your boats cylinders, the internals can be damaged as it tries to compress the water. On top of that, any moisture inside of the engines internals can cause rust which will cause premature wear on the system.
Since most of these leaks and breakdown form inside of the manifolds, it is recommended the manifolds and risers be taken off of the engine and inspected for the failures we have covered. If they are still in good condition, they can be cleaned up and put back on the engine. New gaskets will be required whether new risers and manifolds are used, or if the old ones are reinstalled.
Replacement Procedure
Required Tools
- 9/16″ socket
- 7/16″ socket
- 8mm socket
- 7/16″ wrench
- Flat head screwdriver
- Gasket scraper
- Breaker bar
- Rubber mallet
Required Parts
- New gaskets for manifold, risers, and spacers (Note: not all engines have spacers between the manifolds and risers)
- New manifolds if inspection reveals they need replaced
- New risers if inspection reveals they need replaced
Procedure
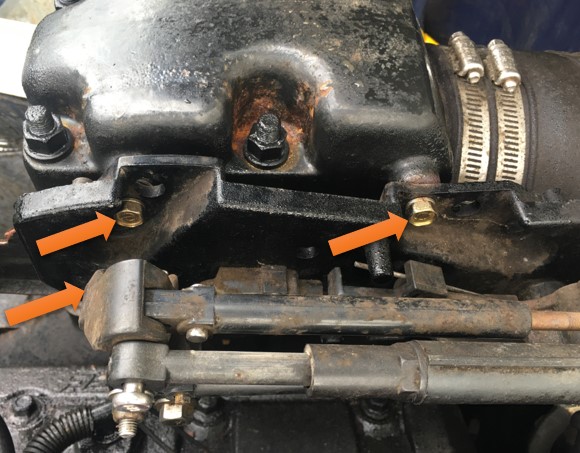
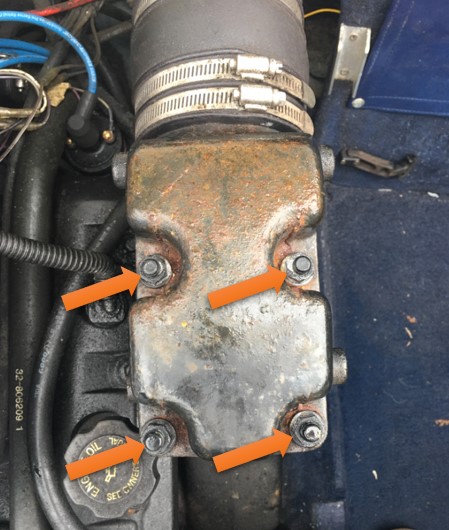
1. Remove the Shift Linkage Plate From the Starboard Riser
Required tools:
This plate is bolted to the riser with three (3) 7/16″ bolts. A combination of socket and wrench can remove these depending on the clearance.
Tip: The boat can be put into gear with the shifter to move the shift cable out of the way to access some of the bolts.
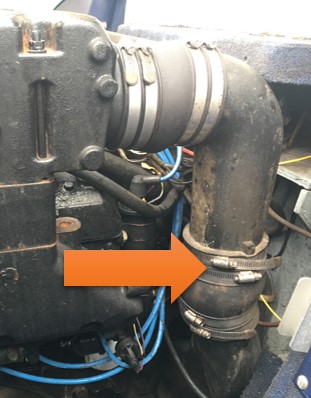
2. Loosen the Clamps Holding the Rubber Exhaust Bellows
Required tools:
This will be the second coupler from the riser that joins the pipes in the vertical direction. Splitting the exhaust at this point will help as the risers will have to be pulled in the upward direction when being removed from the manifolds. This is the same motion needed to separate the exhaust at this position.
Tip: Once the clamps are loose, used your flathead screwdriver to work the bellows off of the exhaust pipe. After years of use, this rubber will be “stuck” to the metal pipe. Working the screwdriver around the pipe to separate the rubber union will make removing the pipe much easier.
3. Remove the Nuts Holding the Riser in Place
Required tools:
Using your breaker bar and 9/16″ socket, break the nuts holding the riser in place looser. There will be a total of eight (8) nuts, four (4) per riser and manifold combination. Once loose, a standard ratchet can be used to fully removed them.
Note: If the nut is tighter on the stud, it may loosen the entire stud and pull it out instead of only the nut. This is not a problem as it can be reinstalled the same way it was removed.
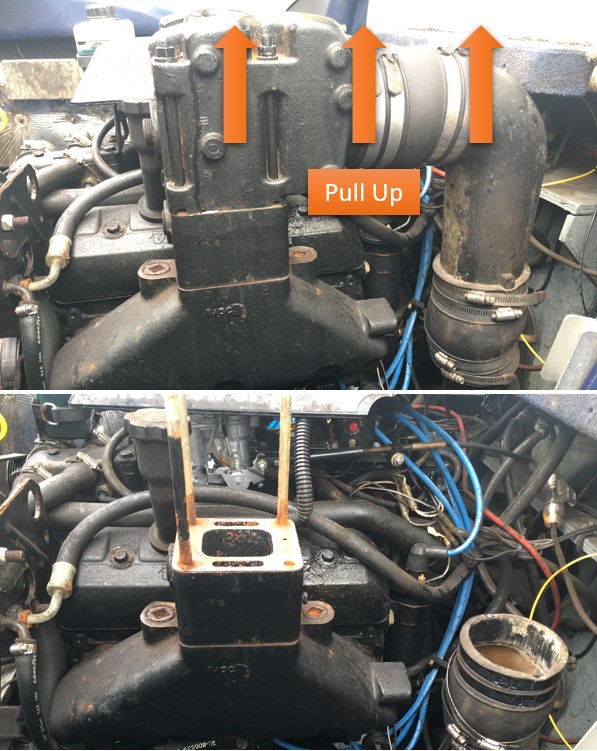
4. Remove the Riser and Exhaust Pipe Assembly
Required tools:
Once all of the nuts have been removed from the studs holding the riser in position, give the riser a few taps with a rubber mallet to break the riser loose from the manifold. It will more than likely be stuck in place but a few firm hits will break it free. Once the riser is able to be moved slightly, firmly pull up on the riser and exhaust pipe and lift strait up.
Tip: The exhaust my need to be worked back and forth as the rubber bellows will be molded to the pipe.
If only removing the risers, all steps are complete. To remove the manifolds as well, move on to step 5.
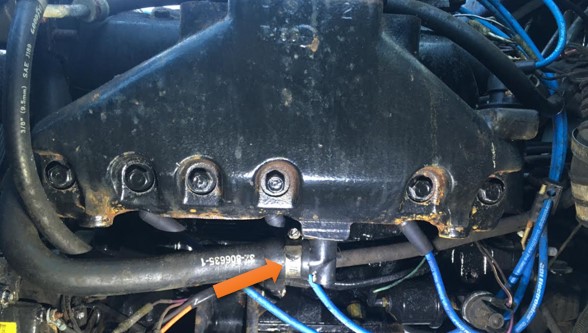
5. Remove Water Hose From Manifold
Required tools:
The water hose connected to the bottom of the manifold needs to be removed next. Loosen the hose clamp with either an 8mm socket or flathead screwdriver. Next using a flathead screwdriver, work the hose off of the 90 degree fitting on the manifold. This hose may need to be wiggled and twisted to remove from the fitting.
Tip: While the hoses are disconnected from the manifolds be sure to inspect for damage and dry rot.
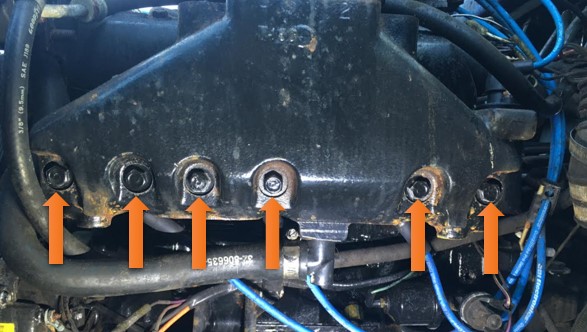
6. Remove Bolts Holding the Manifold to the Block, Remove Manifold
Required tools:
Remove the bolts going through the manifold into the engine block with a 9/16″ socket. Once loosened, the manifold can be hit with a rubber mallet if it does not move freely. It is recommended to do this while the bolts are backed out slightly and not fully out as the bolts will keep the manifold from dropping once it is loose. When removing the manifold, it is easiest to have a second set of hands but can be done with one person. Once the manifold is held in position, the last bolt can be removed and the manifold will be free to remove.
Tip: Take care when removing the last bolt in the manifold as the manifold will come free from the engine and is heavy.
Inspecting Risers and Manifolds
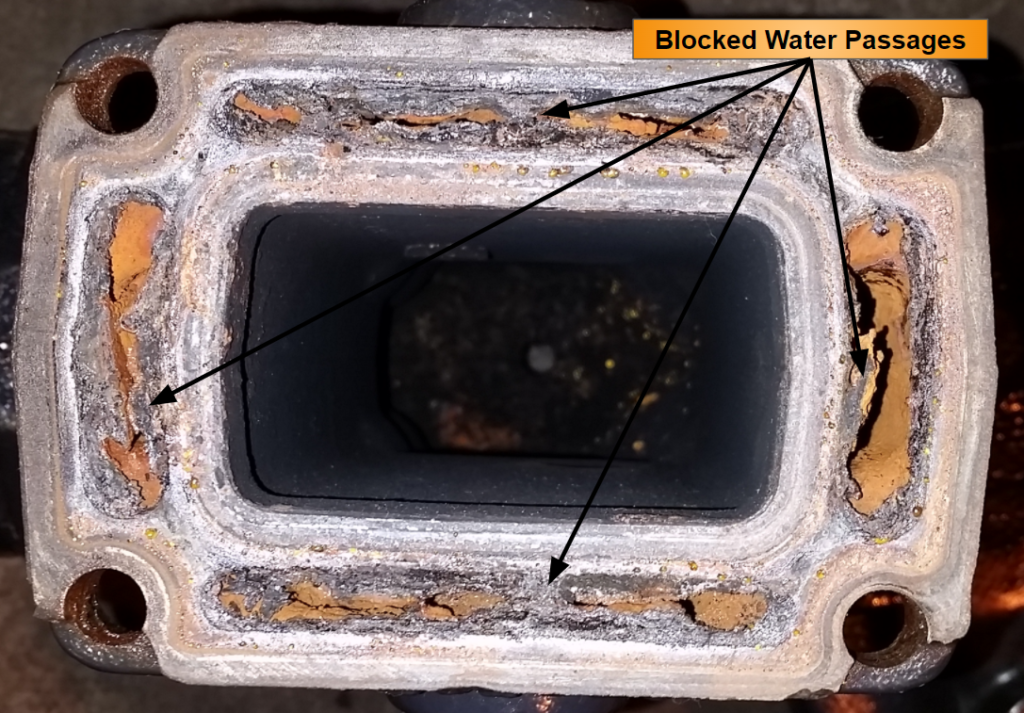
Once removed, the risers and manifolds can be properly inspected. The inspection process consists of checking the water passages to ensure they are not clogged and the walls are not deteriorating. Below is a list of items to check during inspection.
- Check for blockages in the water passages
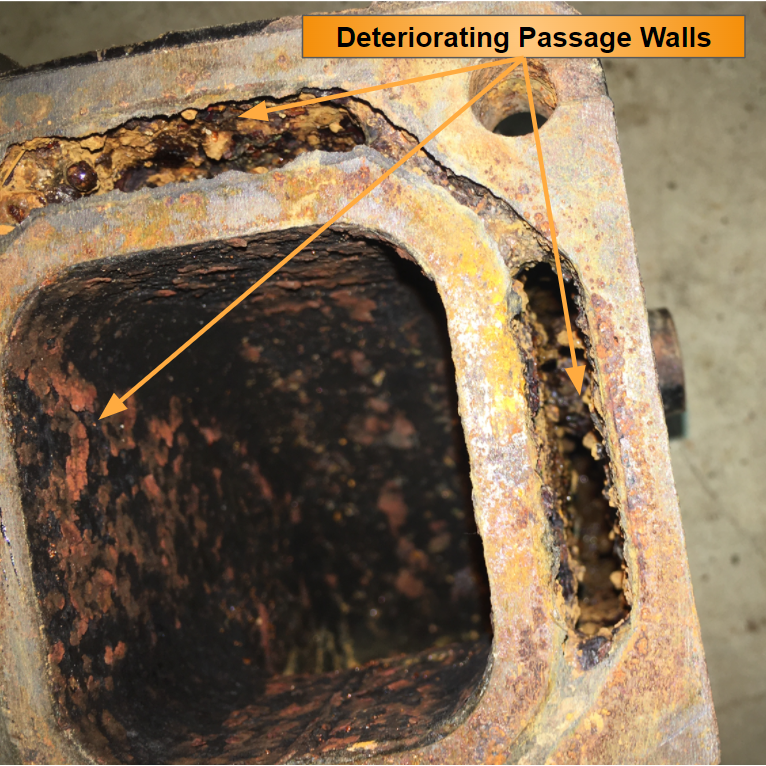
- Check for deteriorating walls to ensure water will not leak into the exhaust passage or to the exterior of the manifold or riser
- Ensure gasket surfaces are intact and there is no damage or rust forming in these areas

Final Thoughts
We hope this article has given some good insight to what the removal, inspection, and installation might entail for risers and manifolds on your boats engine. The job may sound intimidating, but with the information in our guide we hope it has shown that it doesn’t take special tools or a wealth of knowledge to tackle this job. It’s something that most people with a bit of mechanical knowledge can do, and will help save money and potential headaches down the road.